Understanding the Miter Saw: A Comprehensive Guide
Miter saws are vital tools in any severe woodworker's toolbox, providing precision and accuracy in making angled cuts. This short article aims to explore the functionality, types, and best practices related to using a miter saw, offering valuable insights for both novices and skilled artisans.
What is a Miter Saw?
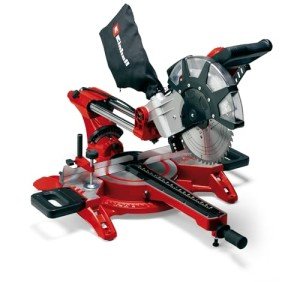
A miter saw is a specific power tool created to make precise crosscuts and miter cuts in wood, metal, and other materials. It consists of a turning blade mounted on a swing arm that enables the user to change the angle of the cut. The saw is normally used for jobs such as framing, trim work, and creating picture frames, where accurate angles are important.
Key Components of a Miter Saw
- Blade and Arbor: The blade is the cutting tool, and the arbor is the shaft that connects the blade to the motor.
- Motor: Provides the power to turn the blade.
- Swing Arm: Allows the blade to swing left and ideal to change the miter angle.
- Fence: A vertical surface area that supports the workpiece and guarantees it is aligned properly.
- Table: The flat surface where the product is positioned for cutting.
- Bevel Mechanism: Some miter saws can also tilt the blade to cut bevels.
- Laser or LED Guide: Helps in lining up the cut accurately.
- Dust Collection System: Captures sawdust to keep the work area clean.
- Miter Scale and Adjustment Knobs: Used to set and fine-tune the miter angle.
- Safety Features: Includes a blade guard, security switch, and anti-kickback claws.
Kinds Of Miter Saws
1. Standard Miter Saw
A standard miter saw can just cut at a repaired height and depth, and it enables miter cuts in both directions (left and right). table mitre saw is appropriate for fundamental cutting and framing tasks.
2. Compound Miter Saw
This kind of miter saw can make both miter and bevel cuts. The blade can be slanted to the side to cut bevels, offering more adaptability for complex tasks.
3. Dual-Bevel Compound Miter Saw
Unlike a single-bevel compound miter saw, a dual-bevel model can tilt the blade to both the left and right. This feature makes it much easier to change between various bevel angles without repositioning the workpiece.
4. Sliding Compound Miter Saw
A sliding compound miter saw combines the bevel and miter capabilities with a sliding mechanism that extends the blade's reach. This enables longer and deeper cuts, making it ideal for cutting wide boards or big workpieces.
5. Laser Guided Miter Saw
Some miter saws come geared up with a laser or LED guide to help line up the cut more exactly. This feature is especially beneficial for novices and those working on in-depth jobs.
How to Use a Miter Saw
Using a miter saw effectively requires a mix of knowledge and practice. Here are the actions to follow:
Step-by-Step Guide
Set Up the Miter Saw:
- Place the saw on a steady, flat surface area.
- Make sure the blade is sharp and the appropriate size for your job.
- Inspect the blade guard and security features are in location and functioning effectively.
- Change the fence and table to the appropriate position for your cut.
Procedure and Mark the Material:
- Measure the workpiece and mark the cutting line with a pencil or marking gauge.
- Double-check the measurements to make sure accuracy.
Set the Miter Angle:
- Use the miter scale and adjustment knobs to set the desired angle.
- For compound miter saws, adjust the bevel angle if needed.
Protect the Material:
- Clamp the workpiece to the table or use the integrated clamps to secure it firmly.
- Ensure the material is lined up with the fence and the cutting line is visible.
Make the Cut:
- Turn on the saw and permit the blade to reach complete speed.
- Gradually lower the blade onto the workpiece, following the marked line.
- Complete the cut and shut off the saw.
- Enable the blade to come to a total stop before raising it.
Tidy up:
- Use the dust collection system to clear sawdust.
- Eliminate the cut pieces and inspect the cut for accuracy.
Security Tips
1. Wear Personal Protective Equipment (PPE)
- Safety Glasses: Protect your eyes from flying particles.
- Ear Protection: Use earplugs or earmuffs to lower sound direct exposure.
- Dust Mask: Avoid breathing in sawdust, which can be harmful.
2. Keep the Work Area Clean
- Regularly clear sawdust and particles from the table and work area to avoid slips and falls.
3. Utilize the Blade Guard
- Always make sure the blade guard is in location and working properly. It provides a barrier in between the blade and your hands.
4. Secure the Material
- Use secures or the integrated clamping system to hold the workpiece safely. Never freehand a cut with a miter saw.
5. Preserve the Saw
- Frequently check and clean up the saw to guarantee it remains in good working condition.
- Change the blade when it palls or damaged.
FAQs About Miter Saws
1. What is the difference in between a miter cut and a bevel cut?
- Miter Cut: A cut made at an angle throughout the width of the material.
- Bevel Cut: A cut made at an angle along the thickness of the product.
2. Can a miter saw cut metal?
- While some miter saws can cut through thin metal with a metal-cutting blade, they are primarily designed for wood. For heavier metal cutting, a dedicated metal-cutting saw is suggested.
3. How do I maintain the blade of my miter saw?
- Tidy the blade after each use to remove resin and debris.
- Sharpen or replace the blade when it ends up being dull.
- Store the blade in a dry, safeguarded environment to avoid rust.
4. What is the best miter saw for a novice?
- A basic miter saw is a good starting point for beginners due to its simplicity. As you acquire more experience, you can think about updating to a compound or sliding compound miter saw for advanced tasks.
5. How do I make sure accurate cuts?
- Use a laser or LED guide if your saw has one.
- Verify your measurements and angles before making it.
- Practice on scrap product before cutting your job pieces.
Advanced Techniques and Tips
1. Making Perfect Miter Joints
- Utilize a miter gauge to make sure the angles are accurate.
- Check the joint with scrap pieces to make sure a tight fit.
- Utilize a clamp to hold the pieces together while gluing.
2. Cutting Crown Molding
- Set the saw to the right compound angle.
- Use a specialized crown stop to hold the molding in location.
- Make multiple test cuts to ensure the angles are precise.
3. Cutting Narrow Pieces
- Use a plume board to hold narrow pieces steady.
- Consider a push stick for included security.
- Constantly cut narrow pieces with the fence assistance.
4. Cutting Thick or Wide Material
- Use a sliding compound miter saw for extended reach.
- Guarantee the material is fully supported on both sides of the cut.
- Make multiple passes if required to accomplish a tidy cut.
5. Dust Management
- Utilize a store vacuum connected to the dust collection port.
- Frequently empty the dust bag or cylinder to maintain suction.
- Think about a dust collection hood to record more sawdust.
A miter saw is a versatile and necessary tool for any woodworker. Whether you are a newbie or an expert, comprehending its components, types, and usage can considerably enhance your woodworking jobs. By following the security standards and advanced methods, you can accomplish accurate and professional-looking cuts, making sure that your jobs are both stunning and practical.
Investing in a quality miter saw and keeping it effectively will not just enhance your work but likewise extend the life of your tool. With the best understanding and practice, a miter saw can end up being an invaluable possession in your workshop, helping you develop elaborate and comprehensive pieces with ease.